- Wind Song: Nahuatl Glyphs and Community Mesh Networks
The Seneca called this place Jaödeogë – “between two rivers” or Dayaogeh – “Beautiful Place of Three Rivers.” When I designed a custom case for my Meshtastic device, I wanted to honor that same geography. But instead of translating, I created something new: a visual sentence in Nahuatl that speaks to both my decolonization journey and what Prototype PGH is building.
What Is Meshtastic?
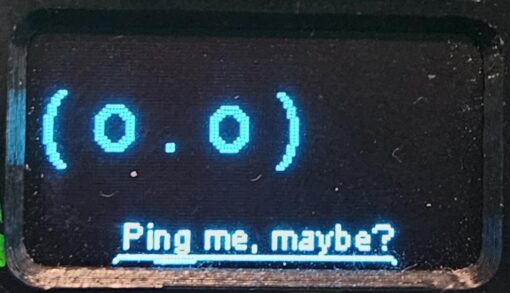
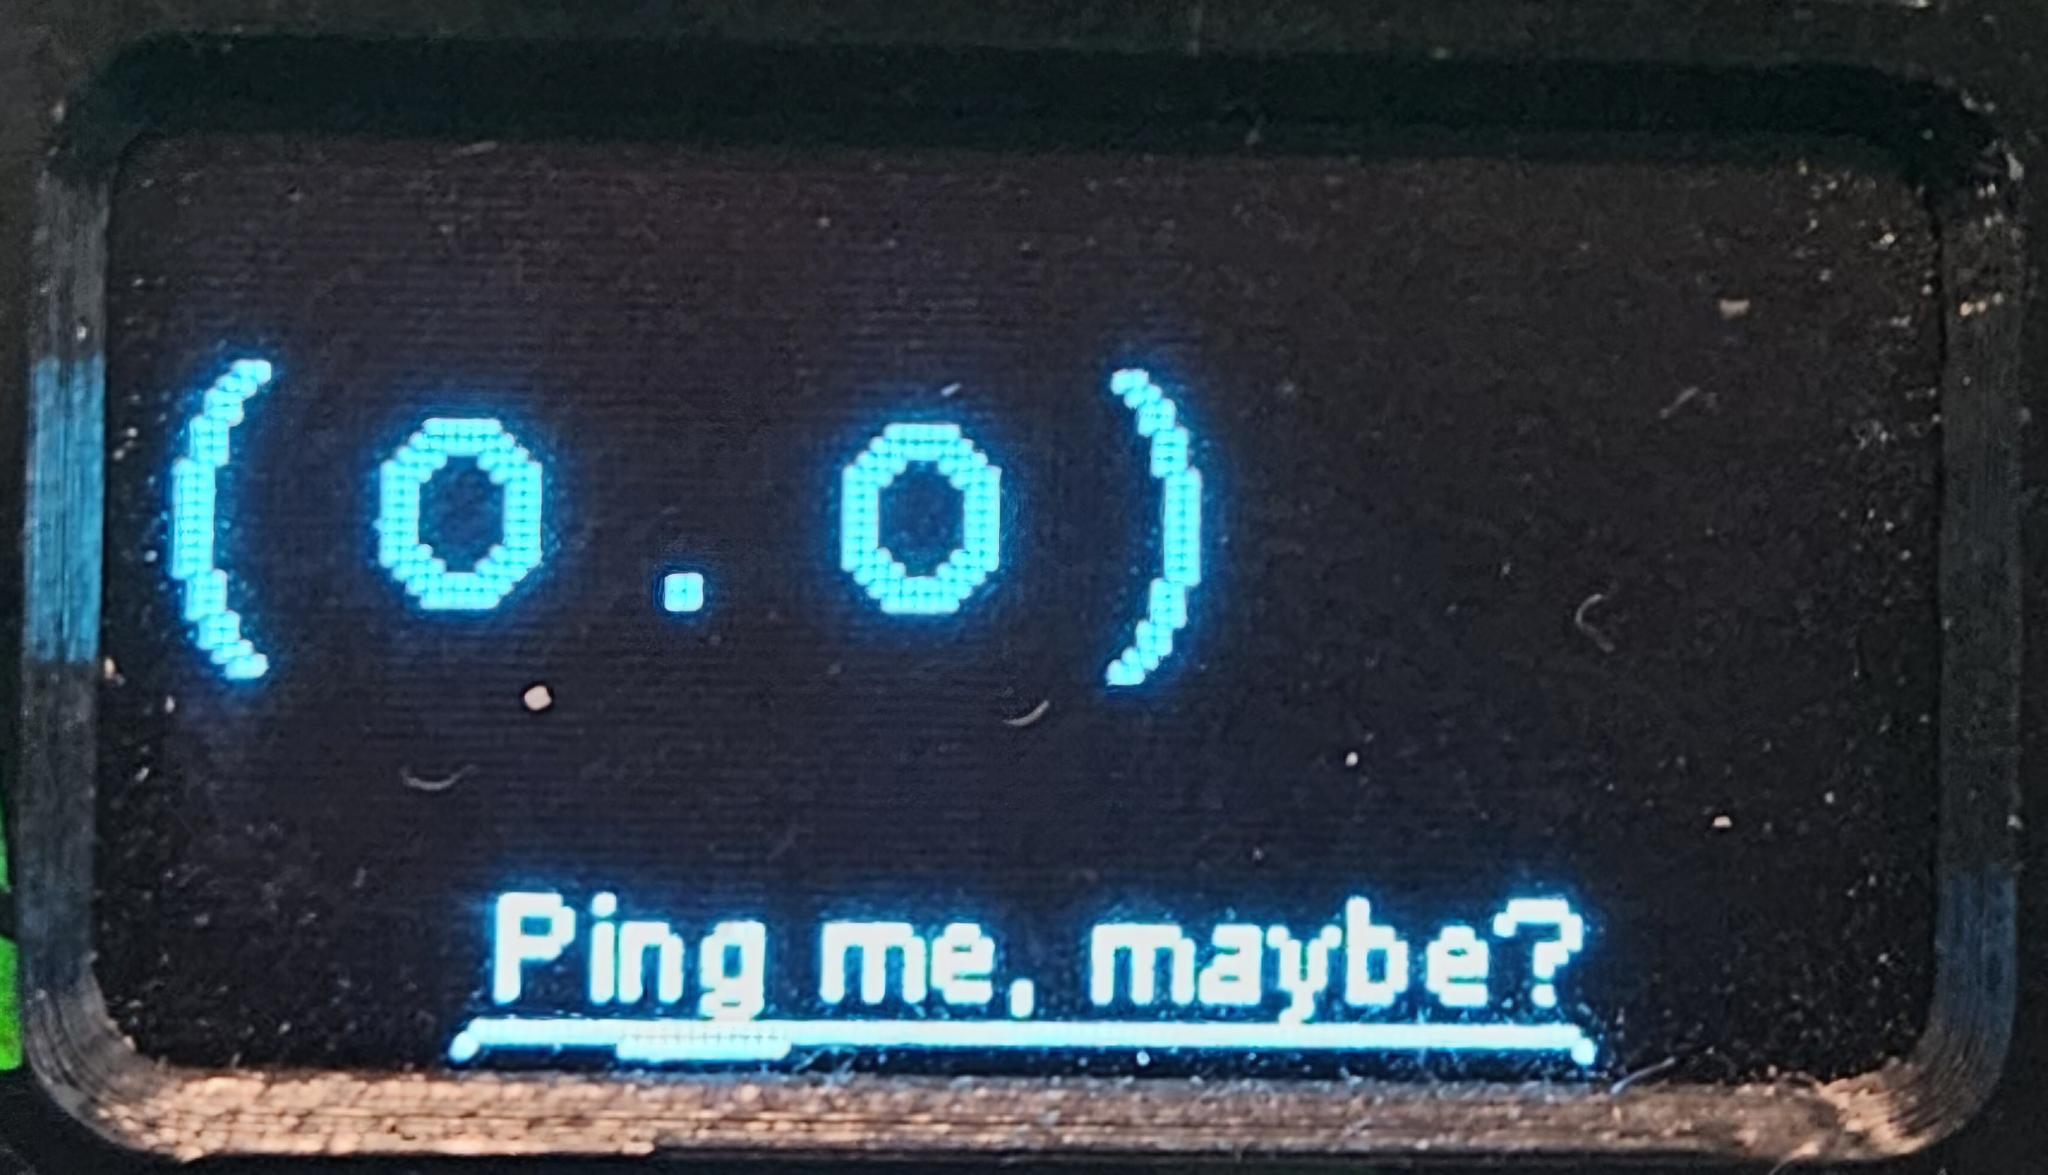
Meshtastic is a community-run mesh network—a way for people to communicate without relying on cell towers or the internet. Nodes (devices like mine) relay messages to each other across distance. It’s infrastructure we own and control. In a natural disaster, when cellular networks fail, mesh networks keep communities connected. I created a module called LoRaBot which changes faces when different things happen on the network and wanted to make a custom case for it.
The Case: Form Meets Function
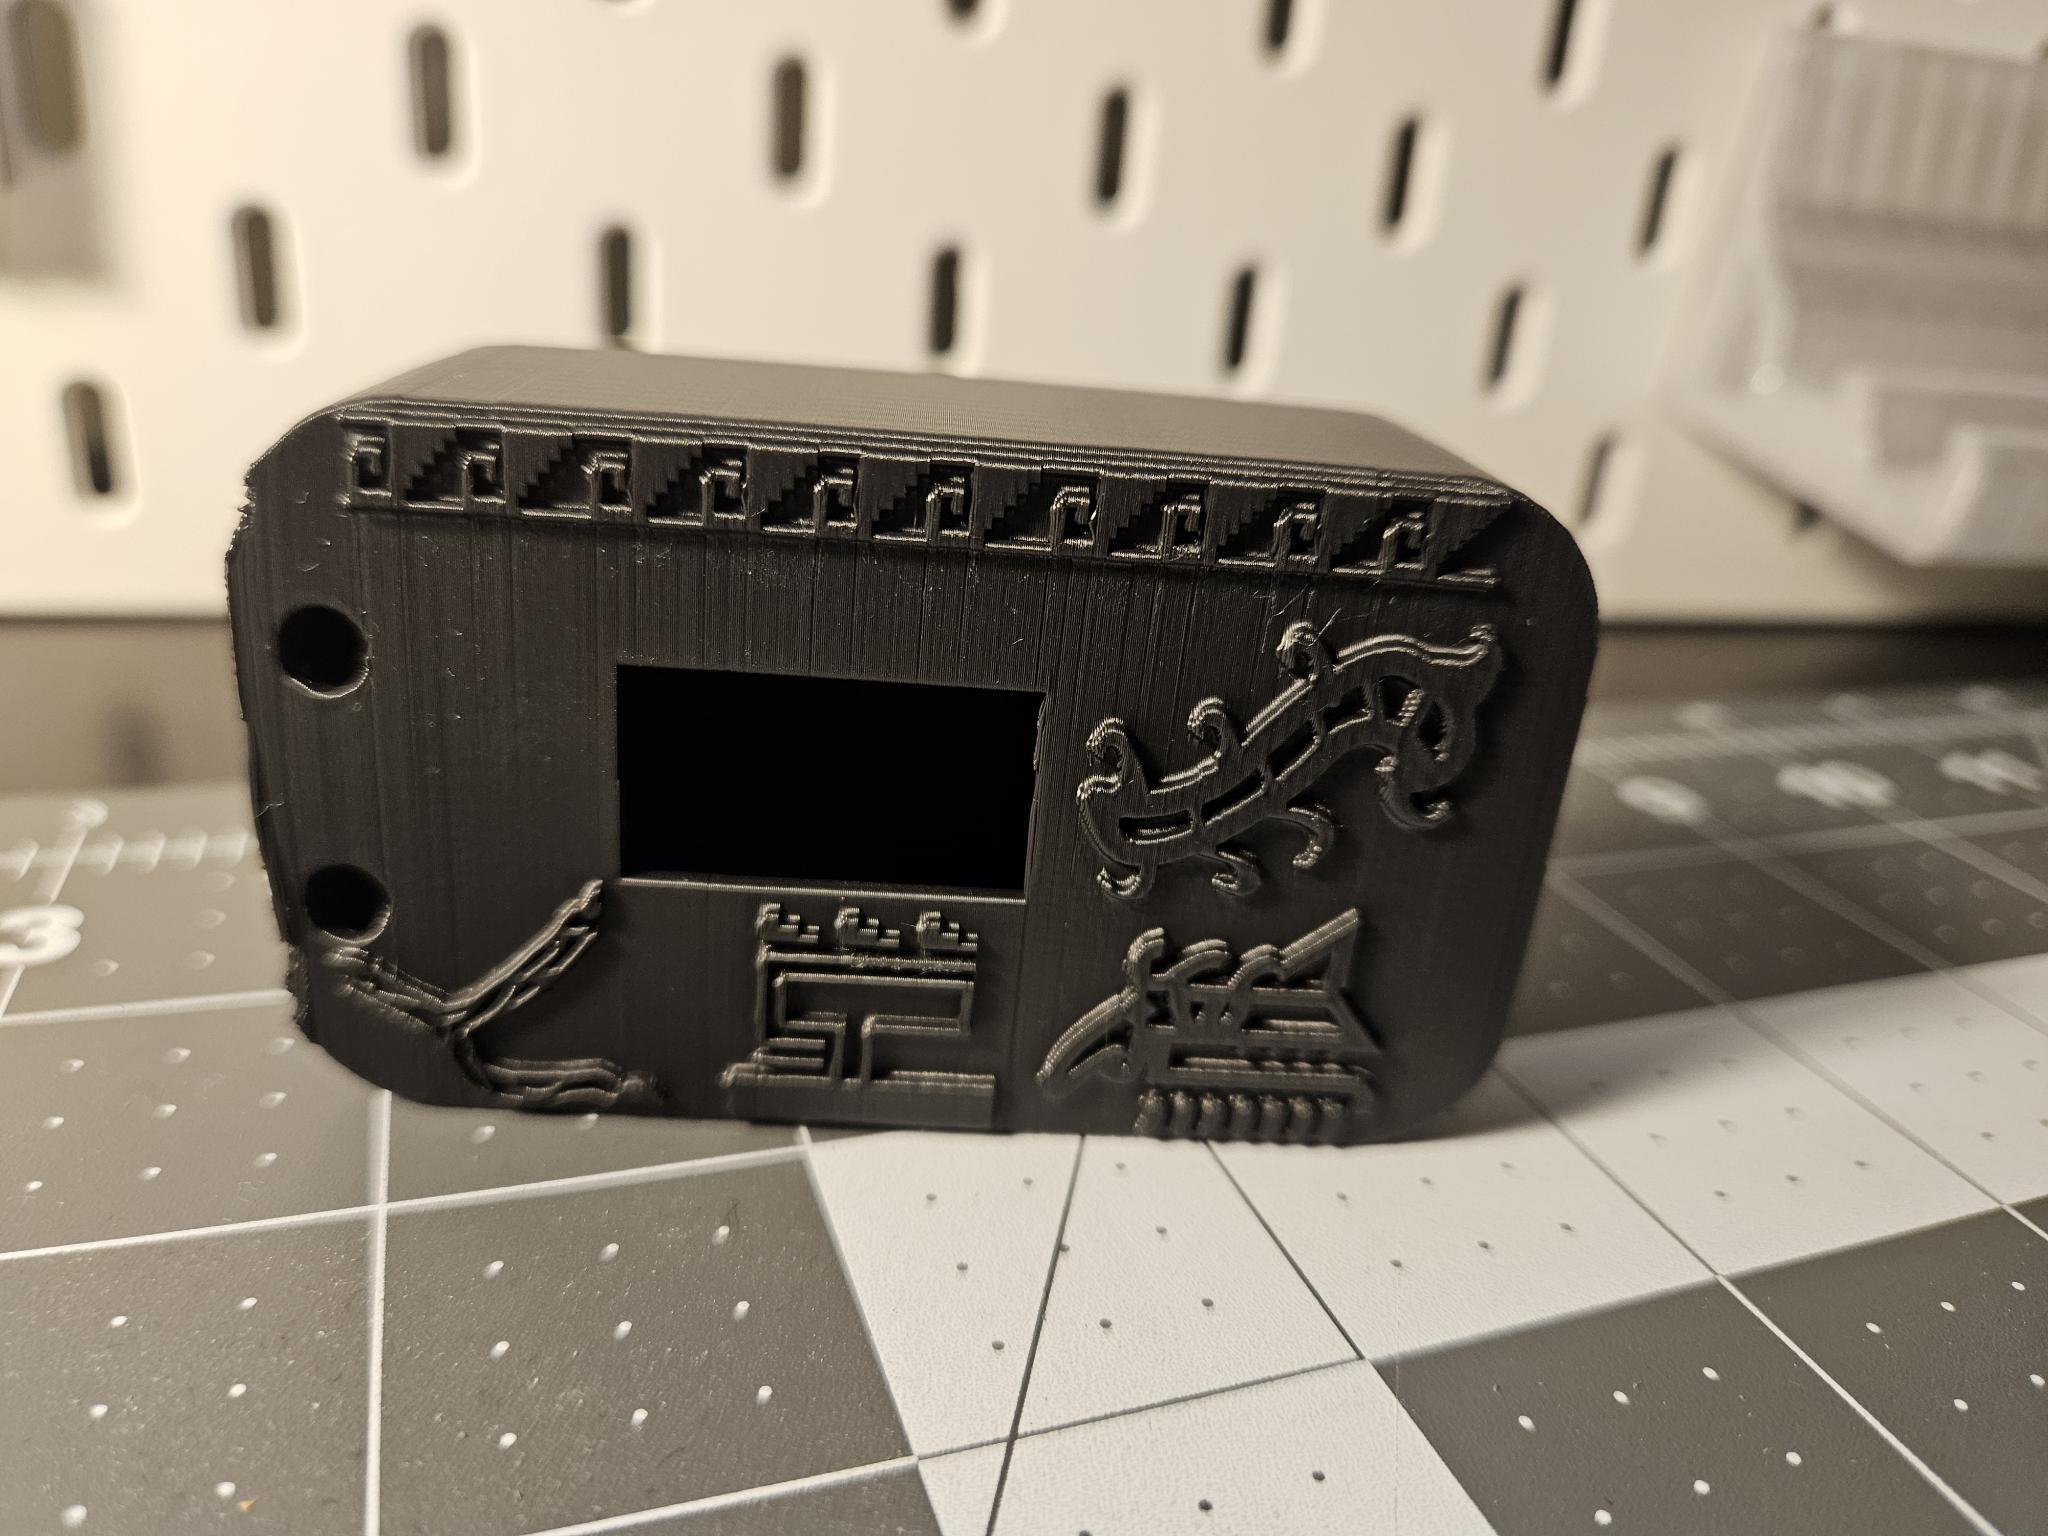
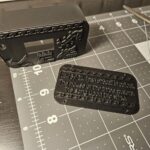
I started with an existing Heltec v3 case design from MakerWorld, then modified it. I needed more internal space for a large battery—essential for a reliable mesh node—so I redesigned the interior while keeping the external profile. The extra space on the front became room for Nahuatl expression.
The Glyph Sentence
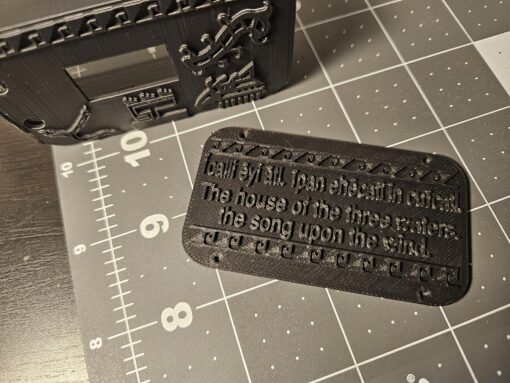
Īcalli ēyi ātl, īpan ehēcatl in cuīcatl
The house of three waters, the song on the wind.
Breaking It Down
Īcalli ēyi ātl (The house of three waters)
- Īcalli: house.
- ēyi ātl: Three waters. Pittsburgh. Dayaogeh. The geography that defines us.
īpan ehēcatl in cuīcatl (The song on the wind)
- in cuīcatl: Song, voice, communication.
- īpan ehēcatl: On the wind.
- Together: The voice doesn’t stay contained. It travels.
Glyph Placement as Spatial Grammar
Nahuatl writing isn’t just about individual symbols—it’s about spatial relationships. How glyphs sit relative to each other conveys meaning. I used this principle to build the case layout:
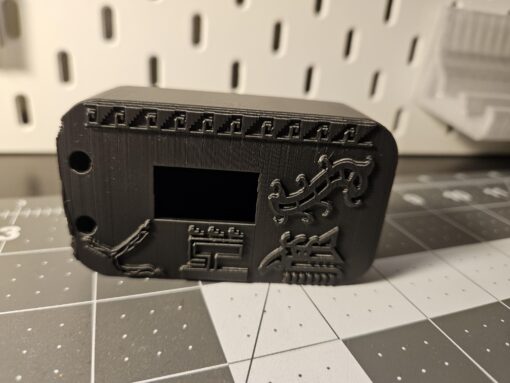
The Geography: Three Rivers (Atl) On the far left sits the three-river glyph—three water streams converging into one point. It anchors the entire composition, grounding the device in Pittsburgh’s actual geography.
The House (Calli) Below the screen sits the house glyph. In Nahuatl spatial grammar, what comes below is foundational, supporting. The calli is the structure, the grounded node.
The Speaker: Screen as Voice The screen displays an animated face—this is the voice emerging. It sits directly on top of the calli, visually showing how the house generates communication. The face becomes the speaker.
The Song (Cuicatl) Above the screen, the cuicatl glyph appears above the speaker’s head—the song emerging from speech. In Nahuatl codices, glyphs placed above or emanating from a figure show what that figure produces or emanates.
The Wind (Ehecatl, the glyph I used more stylized) The wind glyph sits beneath and supporting the cuicatl. This recreates the Nahuatl principle of directional flow: the song rides on the wind. The spatial relationship shows causality—not just two separate concepts, but one carrying the other.
The reading becomes multidirectional and relational, not just left-to-right: Foundation (rivers) → Structure (house) → Voice (face) → Expression (song) → Transmission (wind).
This was my attempt to mirror how Nahuatl glyphs worked in codices—meaning emerged from where things were placed relative to each other, not just what they looked like individually.
Building New Words
How do you represent a radio signal? An invisible mesh network?
For LoRa communications I used Ehecatl Cuicatl (Wind-Song). I paired ehecatl (wind)—the invisible force carrying what we cannot see—with cuicatl (song). In Nahua culture, cuicatl is far more than music: it’s intentional, sacred utterance that carries knowledge, history, and resistance. So ehecatl cuicatl (wind-song) means not just invisible transmission, but meaningful knowledge traveling.
For Pittsburgh itself, I didn’t create a new glyph. I adapted the atl symbol: three separate water streams converging into one point. This is both a traditional symbol and a neologism—honoring Nahuatl visual grammar while extending it to document this place.
What This Means
Creating neologisms for a language marginalized by colonization is my small act of reclamation. I want to show that this language lives, it describes my world now and I build its future.
The glyphs on my case tell this story: A house speaks. Its song travels on wind. It reaches others. They reach back. We build networks. We organize ourselves. We care for each other.
- Mochiuhco Timonelhuah: Beyond the Left Brain, Decolonizing Through Nahuatl
I grew up knowing my Spanish side—the stories, the language, the lineage preserved and passed down. But my Indigenous roots, remained largely silent. The only inklings would be comments about my relatives complexions. Like so many descendants of colonization, I inherited an asymmetry: one ancestry loud and documented, the other severed from me by deliberate erasure. This poem is part of my process of decolonizing, of reconnecting.
Nahuatl isn’t a dead language—about 1.7 million people speak it today across Mexico. It’s alive, evolving, thriving in communities that never stopped speaking it. My disconnection isn’t because the language or culture disappeared; it’s because colonization severed my family’s connection to it. Learning Classical Nahuatl, studying the codices, working with these forms of expression—it’s not about resurrecting something lost. It’s about reconnecting to something that continues, something I was kept from. It’s asking: what do my relatives still know? How do Nahua people see the world? What songs are still being sung?
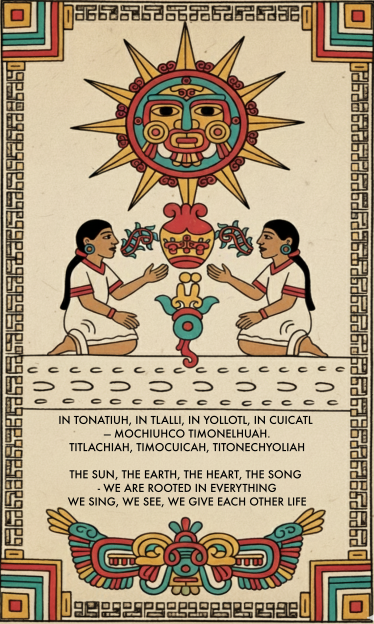
I’ve been working on a piece that brings together language, image, and meaning in ways that connect historical and contemporary Nahua thought. The result is a short poem in Classical Nahuatl paired with a digitally drawn image that speaks to themes of reciprocity, rootedness, and mutual life-giving.
The Language
For the visual piece, I turned to the Visual Lexicon of Aztec Hieroglyphs, a very helpful resource that catalogs pictographic elements from Aztec codices. I also consulted Deciphering Aztec Hieroglyphs: A Guide to Nahuatl Writing (and this helpful associated video ) which provided broader context and useage of the language.
From what I have learned, Classical Nahuatl was not written with a full alphabet or syllabary. Instead, the Mexica used a pictorial-semantic writing system, a mix of logograms, pictographs, and occasional rebus elements. This system was not designed to record full spoken Nahuatl word-for-word.
Nahuatl writing was used heavily for record-keeping, naming, calendrics, and state administration, while the deeper cultural knowledge—stories, songs, poems, ritual speeches, and moral teachings—remained rooted in a rich oral tradition.
Working in Classical Nahuatl meant thinking carefully about verb forms and how they carry meaning. The poem uses first-person plural forms throughout – timonelhuah (we are rooted), titlachiah (we see), timocuicah (we sing)—and crucially, titonechyoliah (we give each other life). That final verb uses a reciprocal construction (to-) that grammatically encodes the mutual nature of the action. We don’t just give life; we give life to each other. The language does philosophical work.
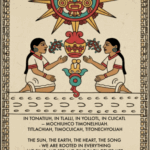
The poem follows the Nahuatl poetic tradition of difrasismo—paired concepts that together create deeper meaning. Tonatiuh-tlalli (sun-earth) represents the cosmos. Yolotl-cuicatl (heart-song) echoes the famous in xochitl in cuicatl (flower and song), the Nahuatl expression for poetry, truth, and beauty.
The Image
The composition came together as a kind of modern codex page: Tonatiuh (the sun) – Prominently at the top, radiating life-giving energy. Tlalli (the earth) – The ground from which the xochitl (flower) showing rootedness in the earth. The two figures facing each other in reciprocal communion embody “we give each other life” – their gestures suggest exchange, dialogue, and mutual animation. Cuicatl (song) – coming from the figures mouths. The central symbol between them, the yollotl (heart, life).
What struck me in working with these glyphs is how much they already contain the concepts I was trying to express. The symmetry, the facing figures, the way hands reach toward shared symbols—these visual conventions encode reciprocity and relationship. I wasn’t inventing a new visual language; I was learning to speak in one that’s been expressing these ideas for centuries.
Pronounciation
In tonatiuh, in tlalli, in yollotl, in cuicatl — mochiuhco timonelhuah. een toh-NAH-tee-oo, een TLAH-lee, een YOH-lohtl, een KWEE-kahtl — moh-CHEE-ooh-koh tee-moh-NEL-wah
Titlachiah, timocuicah, titonechyoliah. tee-tlah-CHEE-ah, tee-moh-KWEE-kah, tee-toh-neh-choh-LEE-ah
Key pronunciation notes:
- tl = one single sound, not “t” + “l” separately
- hu = “w” sound (like English “w”)
- cu/qu = “k” sound (like English “k”)
- ch = like English “ch” in “church”
- Stress usually falls on the second-to-last syllable (shown in CAPS)
- All vowels are pure: a=”ah”, e=”eh”, i=”ee”, o=”oh”
Grammer Guide
In tonatiuh, in tlalli, in yollotl, in cuicatl — mochiuhco timonelhuah.
in = definite article “the” (repeated before each noun for emphasis)
tonatiuh = “sun, the sun deity”
- Root: tona- “to shine, to be warm”
- -tiuh = agentive suffix “the one who does X”
- Literally: “the one who shines/warms”
tlalli = “earth, land, soil”
- Basic noun root tlal- “earth”
- -li = absolutive noun ending
yollotl = “heart, life, life-force, soul”
- Root: yol- “to live”
- -otl = noun suffix
- The heart was the center of life and consciousness in Nahuatl thought
cuicatl = “song, poem”
- Root: cuica “to sing”
- -tl = absolutive noun ending
- Poetry and song were inseparable concepts
mochiuhco = “in everything”
- mochi = “all, everything”
- -co = suffix, locative “in, at, within”
timonelhuah = “we are rooted, we root ourselves”
- ti- = 1st person plural subject “we”
- -mo- = reflexive prefix “ourselves”
- nelhua = verb stem “to root, to take root, to be founded”
- -h = plural marker (makes it “we” not “you singular”)
Titlachiah, timocuicah, titonechyoliah.
titlachiah = “we see, we behold”
- ti- = 1st person plural “we”
- tla- = indefinite object prefix “something/things”
- chia or itta = verb stem “to see, to look at”
- -h = plural marker
timocuicah = “we sing”
- ti- = 1st person plural “we”
- -mo- = reflexive (here it intensifies: “we sing ourselves”)
- cuica = verb stem “to sing”
- -h = plural marker
titonechyoliah = “we give each other life, we animate/enliven one another”
- ti- = 1st person plural “we”
- -to- = reciprocal prefix “each other, one another”
- -nech- or -tech- = object marker (in this reciprocal context)
- yolia = verb stem “to live, to give life to, to animate”
- -h = plural marker
Note: The reciprocal construction with -to- creates the “each other” meaning, making this a mutual action
Performance
Nahuatl poetry was never meant to be read silently. Cuicatl means both “poem” and “song”—they were the same thing. This piece is designed to be sung or chanted, ideally by multiple voices in call-and-response or as a layered community chant. The reciprocal grammar demands reciprocal breath.
I’m still working out the musical setting, but the rhythm of the language itself suggests a steady drum pattern, the kind that would have been played on a teponaztli or huehuetl. The repetition of phrases, the building intensity—it all points toward performance as ritual, as shared action rather than individual consumption.
What I’m Learning
This project has taught me that working in Nahuatl isn’t just about translation—it’s about letting the language reshape how you think. It’s agglutinative structure, where prefixes and suffixes build complex meanings, means that concepts like reciprocity and reflexivity aren’t add-ons; they’re built into the architecture of expression.
Similarly, working with codex imagery isn’t about decoration. These visual forms carry philosophical content. When two figures face each other across a shared symbol, that’s not just an aesthetic choice—it’s a statement about how life and meaning emerge through relationship.
I’m grateful for resources like the Visual Lexicon of Aztec Hieroglyphs website that make this work accessible while maintaining respect for the source material (which is not easy to decipher). And I’m humbled by how much these old forms still have to teach us about reciprocity, rootedness, and the ways we give each other life.
Decolonizing the Mind, Reclaiming Wholeness
This work—learning Nahuatl, creating with codex imagery, singing reciprocal songs—is part of a larger practice of decolonization. Not just decolonizing my family history or reclaiming a severed heritage, but decolonizing the very ways I think, create, and relate to the world.
White supremacy culture, as Tema Okun has documented, operates through characteristics like individualism, binary thinking, perfectionism, and a worship of the written word over other forms of knowing. These aren’t neutral cultural preferences—they’re the residue of colonialism, designed to value certain ways of being (linear, individualistic, competitive) while devaluing others (cyclical, communal, reciprocal).
Western education has trained us to be profoundly left-brain dominant. As neuroscientist Dr. Jill Bolte Taylor explains, we’ve elevated the left hemisphere’s values—individual identity, linear time, hierarchical categorization, acquisition—while suppressing the right hemisphere’s wisdom about interconnection, presence, and our fundamental unity with all life. The left brain says “me and mine and I want more.” The right brain knows “we are one construct”
Working with Nahuatl reopens those suppressed ways of knowing. The language itself resists left-brain dominance: its agglutinative structure builds meaning through relationship and context rather than rigid categories. The reciprocal verb forms—titonechyoliah (we give each other life)—grammatically encode interdependence. You can’t even conjugate the verb without acknowledging that life doesn’t flow one direction; it’s mutual, cyclical, relational.
The codex imagery does similar work. These aren’t just “decorative” or “symbolic”—categories that reduce Indigenous visual knowledge to something less-than alphabetic writing. They’re a complete system of communication that engages spatial thinking, color relationships, and embodied knowledge. Working with these forms exercises parts of my brain and ways of knowing that colonial education systematically atrophies.
This is what I mean by cultural diaspora and grounding. I’m not romanticizing a lost past or trying to “return” to something. I’m recognizing that colonization didn’t just sever my family from Nahuatl—it severed all of us from more holistic, relational ways of being in the world. Learning the language, creating with the glyphs, singing the songs: these practices literally rewire neural pathways, moving me toward the right hemisphere’s truth that we are interconnected, that I am because we are, that life is mutual animation.
In tonatiuh, in tlalli, in yollotl, in cuicatl — mochiuhco timonelhuah.
We are rooted in everything. Not as isolated individuals extracting resources, but as parts of a whole, giving each other life. That’s not just poetry—it’s a different ontology, a different way of being human. And it’s been here all along, waiting to be remembered.
- Empowering Quality Assurance in State IT: Introducing the Context-Driven QA Guide

Introduction
As part of our ongoing commitment to improving the quality and reliability of technology solutions across the Commonwealth, I’m excited to share a new resource developed for our QA and project teams: the Context-Driven QA Guide. This guide was created during my tenure with CODEPA (the Commonwealth Office of Digital Experience), working under the Office of Administration.
One of our goals: to help teams across the State integrate modern, flexible, and effective quality assurance (QA) practices into every stage of IT projects.
Why a Context-Driven Approach?
Traditional “one-size-fits-all” testing strategies often fall short in the complex, varied environments we face in state government. Our projects serve diverse stakeholders, operate under unique constraints, and must adapt to changing requirements and technologies. The Context-Driven QA Guide is designed to address these realities. It provides a practical framework that empowers teams to:
- Adapt testing practices to the specific needs and risks of each project.
- Focus on value and mission, not just process compliance.
- Leverage both human expertise and automation in a balanced, thoughtful way.
- Continuously learn and improve as projects evolve.
What’s Inside the Guide?
- Purpose & Goals: Who the guide is for and what it aims to achieve.
- Guiding Principles: The foundation of context-driven testing, emphasizing adaptability, skill, and mission alignment.
- Phases of Testing: How QA fits into every stage of the project lifecycle.
- Context Analysis: Tools and frameworks for understanding your project’s unique environment and risks.
- Planning: How to set clear objectives, choose the right tools, and design effective tests.
- Execution & Automation: Practical advice on balancing manual and automated testing, with a focus on what truly adds value.
- Evaluation & Reporting: How to communicate results, report bugs effectively, and drive continuous improvement.
- Resources: Further reading and training opportunities for ongoing learning.
Who Should Use This Guide?
This guide is intended for:
- New QA professionals looking for a practical starting point.
- Project managers seeking to integrate QA into their workflows.
- Development and operations teams who want to collaborate more effectively on quality.
- Anyone in the interested in building better, more reliable digital services.
How to Access and Use the Guide
The guide is available as an interactive web resource.
Teams are encouraged to:
- Reference it during project planning and retrospectives.
- Use its frameworks and checklists to guide test strategy discussions.
- Share it with new team members as part of onboarding.
- Suggest improvements and contribute to its evolution.
A Step Forward for State IT Quality
This initiative reflects our belief that quality is everyone’s responsibility—and that the best results come from empowering teams with the right tools, knowledge, and flexibility. By adopting a context-driven approach, we can deliver better outcomes for the people and communities we serve. Let’s keep raising the bar for quality in State IT—together.
- Running Microsoft’s 1-Bit BitNet LLM on My Dell R7910 – A Self-Hosting Adventure

So Microsoft dropped this 1-bit LLM called BitNet, and I couldn’t resist trying to get it running on my new homelab server. Spoiler alert: it actually works incredibly well, and now I have a pretty capable AI assistant running entirely on CPU power! For the demo click on the plus button on the bottom right ;)
My Setup (And Why This Matters)
I’m running this on my Dell Precision Rack 7910 – yeah, it’s basically a workstation crammed into a rack case, but hey, it works! Here’s what I’m working with:
My Dell R7910:
- Dual Xeon E5-2690V4 processors (28 cores total)
- 64GB ECC RAM
- Running Proxmox VE
- Already hosting Nextcloud, Jellyfin, and WordPress
The cool thing about BitNet is that it doesn’t need fancy GPU hardware. While I’m running it on dual Xeons, you could probably get away with much less.
Minimum specs you’d probably want:
- Any modern 4+ core CPU
- 8GB RAM (though 16GB+ is better)
- 50GB storage space
- That’s literally it – no GPU required!
What the Heck is BitNet Anyway?
Before we dive in, let me explain why I got excited about this. Most AI models use 32-bit or 16-bit numbers for their “weights” (basically the model’s learned knowledge). BitNet uses just three values: -1, 0, and +1.
Sounds crazy, right? But somehow it works! The 2 billion parameter BitNet model:
- Uses only ~400MB of RAM (my Llama models use 4-8GB+)
- Runs 2-6x faster than similar models
- Uses way less power
- Still gives pretty decent responses
I mean, when I first heard “1-bit AI,” I thought it would be terrible, but Microsoft’s research team clearly knew what they were doing.
The Journey: Setting This Thing Up
Step 1: Creating a Container for BitNet
Since I’m already running a bunch of services running on Proxmox on my R7910, I decided to give BitNet its own LXC container. This keeps things clean and prevents it from messing with my other stuff.
In Proxmox, I created a new container with these specs:
- Template: Ubuntu 22.04 LTS
- CPU: 16 cores (leaving 12 for my other services)
- Memory: 32GB (plenty of headroom)
- Storage: 80GB
Important: You need to edit the container config file to add these lines, or the build will fail:
# Edit /etc/pve/lxc/[YOUR_CONTAINER_ID].conf
features: nesting=1
lxc.apparmor.profile: unconfined
Trust me, I learned this the hard way after wondering why cmake was throwing mysterious errors!
Step 2: Getting the Environment Ready
First things first – we need the right tools. BitNet is picky about its build environment:
# Basic stuff
apt update && apt upgrade -y
apt install -y curl wget git build-essential cmake clang clang++ libomp-dev
Now here’s where I made my first mistake – I tried to use Python’s venv initially, but BitNet’s instructions specifically mention conda, and there’s a good reason for that. Just install Miniconda:
cd /tmp
wget https://repo.anaconda.com/miniconda/Miniconda3-latest-Linux-x86_64.sh
chmod +x Miniconda3-latest-Linux-x86_64.sh
./Miniconda3-latest-Linux-x86_64.sh
source ~/.bashrc
Step 3: The BitNet Installation Saga
This is where things got interesting. The GitHub instructions look straightforward, but there are some gotchas:
mkdir -p /opt/bitnet && cd /opt/bitnet

# This --recursive flag is CRUCIAL - don't skip it!
git clone --recursive https://github.com/microsoft/BitNet.git
cd BitNet

# Create the conda environment
conda create -n bitnet-cpp python=3.9
conda activate bitnet-cpp
pip install -r requirements.txt
pip install huggingface_hub
Now for the fun part – downloading the model and building everything:
# Download the official Microsoft model
mkdir -p models
huggingface-cli download microsoft/BitNet-b1.58-2B-4T-gguf --local-dir models/BitNet-b1.58-2B-4T

# Build the whole thing
python setup_env.py -md models/BitNet-b1.58-2B-4T -q i2_s
Pro tip: This build step takes a while. On my dual Xeons, it was about 10 minutes of heavy CPU usage. Grab a coffee – it’s compiling a ton of optimized C++ code.
Step 4: Testing My New AI
Once the build finished, I had to try it out:
python run_inference.py -m models/BitNet-b1.58-2B-4T/ggml-model-i2_s.gguf -p "Hello, how are you?" -cnvAnd it worked! The responses weren’t GPT-4 quality, but they were coherent and surprisingly good for something running entirely on CPU. My partner thought I was connected to a service like openAI because the responses were so fast and the resource usage was so low ^_^
But I didn’t want to just run it in a terminal. I wanted to integrate it with AnythingLLM that I already had running.
Step 5: Making BitNet Play Nice with AnythingLLM
Here’s the cool part – BitNet comes with a built-in API server:
python run_inference_server.py -m models/BitNet-b1.58-2B-4T/ggml-model-i2_s.gguf -p 8080 --host 0.0.0.0Then in AnythingLLM, I just added it as a “Generic OpenAI” provider:
- API Endpoint:
http://[my_container_ip]:8080 - Model Name:
BitNet-b1.58-2B-4T - Token Context Window: 4096 (can be adjusted)
- Max Tokens: 1024 (can be adjusted)
And boom – I had BitNet responding to queries through AnythingLLM’s nice web interface!
Step 6: Making It Actually Reliable
Running things manually is fun for testing, but I wanted this to be a proper service. So I created a systemd service:
sudo nano /etc/systemd/system/bitnet.service[Unit] Description=BitNet LLM API Server After=network.target Wants=network.target [Service] Type=simple User=root Group=root WorkingDirectory=/opt/bitnet/BitNet Environment=PATH=/root/miniconda3/envs/bitnet-cpp/bin:/usr/local/sbin:/usr/local/bin:/usr/sbin:/usr/bin:/sbin:/bin ExecStart=/root/miniconda3/envs/bitnet-cpp/bin/python run_inference_server.py -m models/BitNet-b1.58-2B-4T/ggml-model-i2_s.gguf -p 8080 --host 0.0.0.0 Restart=always RestartSec=10 StandardOutput=journal StandardError=journal [Install] WantedBy=multi-user.targetsudo systemctl daemon-reload sudo systemctl enable bitnet.service sudo systemctl start bitnet.serviceNow BitNet automatically starts when the container boots, and if it crashes, systemd brings it right back up.
The Results: How Does It Actually Perform?
I’ve been running this setup for a while now, and I’m honestly impressed. On my R7910:
- Response time: Usually 1-3 seconds for short responses when running in the container itself.
- When connected to anythingllm given the context windows and max tokens I put in it averaged about 7-8 seconds before responding but then would output that response relatively quickly
- Memory usage: Steady ~400MB as advertised
- CPU usage: Spikes during inference, then drops to almost nothing
- Quality: Good enough for basic tasks, coding help, and general questions
It’s not going to replace GPT-4 for complex reasoning, but for a lot of everyday AI tasks, it’s surprisingly capable. And the fact that it’s running entirely on my own hardware with no API calls or subscriptions? That’s pretty sweet.
Demo!!
Click the plus button on the bottom right!
<!– Paste this script at the bottom of your HTML before the tag. See more style and config options on our docs https://github.com/Mintplex-Labs/anything-llm/tree/master/embed/README.md –>Lessons Learned and Gotchas
Things that tripped me up:
- Forgetting the
--recursiveflag when cloning – this downloads necessary submodules - Not installing clang – the error messages weren’t super clear about this
- Trying to use venv instead of conda – just follow their instructions!
- Container permissions – those LXC config additions are crucial
Performance tips:
- Give it plenty of CPU cores if you can
- 32GB RAM is probably overkill, but it’s nice to have headroom
- The
i2_squantization seems to be the sweet spot for quality vs speed
What’s Next?
I’m planning to experiment with:
- Different quantization types (
tl1vsi2_s) - Running multiple model variants simultaneously
- Maybe trying some fine-tuning if Microsoft releases tools for that
The self-hosting AI space is moving fast, and BitNet feels like a real game-changer for those of us who want capable AI without needing a mortgage-sized GPU budget.
Wrapping Up
Setting up BitNet on my Dell R7910 turned out to be way more straightforward than I expected, once I figured out the few gotchas. If you’ve got a decent CPU and some spare RAM, I’d definitely recommend giving it a shot.
Having a capable AI assistant running entirely on your own hardware is pretty liberating. No API keys, no usage limits, no privacy concerns about your data leaving your network. Just pure, self-hosted AI goodness.
Plus, there’s something satisfying about telling people your AI assistant is running on a 1-bit model that uses less RAM than Chrome with a few tabs open!
- Documenting Dad: An AR-Enhanced Scientific Study of Dad in the Wild

In the spirit of Iceland’s cherished Jólabókaflóðið (Christmas Book Flood) tradition, I embarked on creating something special for my dad this Christmas – a whimsical “field guide” studying the curious creature I fondly call “Pops.”
The Concept
Imagine David Attenborough narrating a nature documentary, but instead of following a rare bird or elusive big cat, he’s studying… my dad. That’s essentially what “Pops: A Field Guide” is – a scientific-style observation of my father’s natural habits, behavioral patterns, and comical fear of cute dogs, all written with love and humor.


The Technology
What made this book truly exciting for me to create is its augmented reality (AR) feature. Certain photos throughout the book serve as AR markers – when viewed through a phone or tablet, they spring to life as videos. Making it work is as simple as scanning a QR code in the book and opening up the webpage.
[Code Repository: GitLab Link]
The AR implementation uses:
- AR.js for marker-based augmented reality
- A-Frame for 3D scene rendering
- Web-based delivery (no app required!)
The Creation Process
Writing and Design
Using Canva’s book creation tools, I crafted each page to mimic traditional nature field guides, complete with:
- “Scientific” observations
- Habitat studies
- Behavioral patterns
- Timeline Analysis
All written with a blend of factual family history and playful scientific parody.
Audio Narration
To complete the nature documentary feel, I created an audiobook version narrated in a style reminiscent of Sir David Attenborough. This added an extra layer of authenticity to the “scientific” observations. Here is a clip:

Technical Implementation
The AR features were implemented using marker-based tracking, allowing videos to appear when specific photos are scanned. The entire system runs in a web browser, making it accessible without any special software installation.
The Jólabókaflóðið Connection
The Icelandic tradition of Jólabókaflóðið, where books are exchanged on Christmas Eve, provided the perfect occasion for this gift. This tradition, which translates to “Christmas Book Flood,” celebrates the joy of reading and sharing stories during the holiday season.
The Result
The final product is a multi-layered experience:
- A physical book filled with photos and humorous observations
- An AR experience bringing memories to life through video
- An audiobook adding another dimension of entertainment
- A celebration of family, technology, and tradition
Technical Details
For those interested in creating similar AR-enhanced books, the technical implementation is available on GitLab. The system uses:
- Pattern-based markers for video triggering
- Web-based AR for universal accessibility
- Responsive design for various devices
- Audio on/off functionality
- Cross-platform compatibility
Creating Your Own
Interested in making something similar? The basic steps are:
- Design your book (I used Canva)
- Generate AR markers for your chosen images (link in the gitlab README doc)
- Set up the web-based AR viewer on a server (local or on the net)
- Test thoroughly across devices
- Print and share!
Conclusion
“Pops: A Field Guide” represents more than just a clever use of technology – it’s a celebration of family, humor, and the joy of giving. By combining traditional bookmaking with modern AR technology, it creates a unique way to preserve and share family memories.